# Frequently Asked Questions
> Find answers to common questions about FlyWP on our FAQs page. Get quick solutions and insights in a nut shell without messing here and there.
Source: https://flywp.com/docs/faqs/faq/
Quick answers to the questions we hear most. Select a question to expand its answer.
## Should I Use a Caching Plugin on FlyWP?
You’re using FlyWP and everything is working great. Cool! Now, you may be wondering which plugin you should use. If you have questions like
*Should I be using any other cache plugins like WP Rocket and LiteSpeed Cache along with FlyWP and Redis Object Cache plugins for my WordPress site?*
Or,
*If I’m using any other cache plugins like WP Rocket and LiteSpeed Cache, can I delete the FlyWP and Redis Object Cache plugins for my WordPress site?*
Or
*Should I use X caching plugin on my website* on FlyWP?
You can disable the caching from within the FlyWP dashboard and the FlyWP plugin. However, we would not recommend it. The FlyWP plugin is essential to communicate from the FlyWP platform to your website. It also works with magic login, the email setup for WordPress-related emails, and more. In addition, the FlyWP plugin is required for many things as we rely on it to communicate to the WordPress site via REST API and offer features such as cache clearing, OPcache management, and email configuration. In the future, we will add more features to make your/our lives easier.
:::caution
We recommend using the **[**FlyWP Helper plugin**](https://wordpress.org/plugins/flywp/)** to make sure FlyWP can communicate with your website and you get the optimal performance from your website. Make sure you have installed and activated the [**FlyWP Helper plugin**](https://wordpress.org/plugins/flywp/) to get the best out of FlyWP
– Keep the **Redis plugin active** as FlyWP makes sure your server has Redis and Redis is great for object caching.
– The **[**FlyWP Helper plugin**](https://wordpress.org/plugins/flywp/)** offers page cache support natively via **NGINX FastCGI cache**, you **don’t need** a separate page caching plugin (E.g., WP Rocket/LiteSpeed Cache/WP Fastest Cache/X plugin for page caching)
:::
:::tip
For JavaScript & CSS Minification, you can use any optimization plugin that does this, including WP Rocket, [Perfmatters](https://perfmatters.io/), Falcon, or others. If you’re using any caching plugin for CSS/JS optimization, make sure to turn off the caching and use only as Performance Optimizer plugin.
✅ **We’ve found that NGINX FastCGI Cache (via FlyWP Helper plugin) + Redis cache together work significantly faster than just WP Rocket/any caching plugin alone on FlyWP**
:::
**We recommend using the Redis plugin + NGINX FastCGI caching with the FlyWP Helper plugin**. This combination maximizes the speed, and efficiency of server resources, and performs very well on FlyWP provisioned sites. WP Rocket does not offer in-plugin support for Redis. To leverage the capabilities of Redis, you would need to use the Redis plugin. (Redis is enabled by default on all FlyWP provisioned servers)
*(Thanks [Jeff Brigman on Facebook](https://www.facebook.com/groups/639964574703904/?multi_permalinks=822021159831577&hoisted_section_header_type=recently_seen&__cft__[0]=AZWzOjc6qZwifQv4UUKSEMKPRDU5e8eL2kK3khWXuTc2jnEMl9cSqK3WESdXrA7UNUNzoimJLSb_uzTR9hoz3wYM8e1VKKYfQY_LLrNyJzX5bDsf8CHSMfZ14Pd7eop9Rg7qs9Oc_6rLmKEl842K6DeWQKJuQyboarHgkI2w4j1RmJMpA3RONjafVM7qtFnb5kZuIdXy-eYj4h0754Gr2NQ-UBJ9w6RWUrXCrIGgt2iyUable0HN9YbMel7QX1G44OA) for thoughtful suggestions)*
## How do I add a custom NGINX config to a single website?
Go to this directory and create the conf file. **/home/fly/domain.com/config/nginx/custom/server/**
Then restart nginx (FlyWP Site Dashboard > Manage > Restart Nginx)
## Why does Site Health report a loopback request error?
WordPress sends a request to **wp-cron.php** to get this loopback info. However, as a security precaution, we are blocking access to wp-cron.php. So nginx returns a **403** response when WordPress sends that request. That’s why you’re seeing this loopback issue along with the page cache header. You can ignore this error, nothing to worry about. We trigger cron every 10 minutes via wp-cli, so your cron is executing perfectly, no issues there.
## How do I enable unfiltered uploads for fonts and other files?
To enable unfiltered uploads in WordPress, you need to manually edit the `wp-config.php` file:
1. **Access Your WordPress Files**: Use an FTP client or your hosting provider’s file manager.
2. Locate `wp-config.php`: You will find wp-config.php under your **FlyWP Sites > WP Config** section.
3. Edit `wp-config.php`: Go with the **Edit Manually**

- **Add the Following Line**: Preferably above the line that says `/* That's all, stop editing! Happy publishing. */`
```
define('ALLOW_UNFILTERED_UPLOADS', true);
```
- **Save Changes**: Save and upload the file back to your server if needed.
This change allows unfiltered uploads, so use it with caution due to potential security risks.
## How do I set up email for my sites?
FlyWP by default doesn’t provide email services. However, you can easily connect any external email gateway with FlyWP. Handling domain emails externally has several benefits, and here’s why it’s a better approach:
### Why FlyWP doesn’t offer email by default?
Yes, we don’t offer email hosting. Though it’s technically possible to setup email server in the same server, but it wouldn’t reach the inbox. Because simply email is hard, your IP isn’t warmed for sending emails, dealing with reputation and blacklisting, etc. That’s why you should use reputable email senders like SendGrid, Postmark, Mailgun, etc.
We make it easy to configure an SMTP server so that your site can send via [3rd party sender without needing any SMTP plugin](https://flywp.com/docs/site/email/).
FlyWP recommends using a known and trusted email provider
#### Benefits of Using External Email Services
**Reliability and Uptime**
- **Specialized Services**: External email providers specialize in email delivery, ensuring high reliability and uptime. They have robust infrastructures designed specifically for handling large volumes of emails without downtime.
- **Redundancy**: They often have redundant systems in place to prevent service interruptions.
- **Advanced Security Measures**: External providers invest heavily in security, offering features like encryption, spam filtering, and advanced threat detection to protect your emails.
- **Compliance**: Many email services comply with international standards and regulations, such as GDPR, ensuring your emails are handled with the highest level of security and privacy.
- **Flexible Plans**: External providers offer various plans that can scale according to your business needs, from small startups to large enterprises.
- **Resource Management**: By offloading email management, you free up server resources on your FlyWP setup, ensuring your site runs optimally.
- **Dedicated Support**: Email providers offer dedicated support teams who are experts in managing and troubleshooting email-related issues.
- **Automatic Updates**: They handle all updates and maintenance, ensuring your email service is always up-to-date with the latest features and security patches.
- **Rich Features**: External email services come with a plethora of features like advanced email filtering, automated responses, and integration with other business tools (e.g., calendars, contacts).
- **Seamless Integration**: They often integrate seamlessly with other third-party applications and platforms, enhancing your overall productivity.
### Business Email Providers
| Provider Name | Pricing |
| --- | --- |
| [Google Workspace](https://workspace.google.com/) | Starts at $6 per user/month |
| [Microsoft 365](https://www.microsoft.com/en-us/microsoft-365) | Starts at $5 per user/month |
| Zoho Mail | Starts at $1 per user/month |
| [ProtonMail](https://protonmail.com/) | Starts at €5 per user/month |
| [FastMail](https://www.fastmail.com/) | Starts at $3 per user/month |
| [Amazon WorkMail](https://aws.amazon.com/workmail/) | Starts at $4 per user/month |
| Rackspace Email | Starts at $2.99 per user/month |
| [iCloud+](https://www.apple.com/icloud/) | Starts at $0.99 per user/month Apple offers email hosting with iCloud+. It’s $.99 a month comes with 50GB of storage, you can add 5 domains with 3 email address per domain, you’ll need an Apple device just to activate iCloud mail, after that everything can be done through icloud.com. If you host your DNS with Cloudflare there’s also one click setup, super painless just a few clicks and you’re set |
| [MXRoute](https://mxroute.com/) | Starts at $5 per year |
| [Cloudflare Email Routing](https://www.cloudflare.com/developer-platform/email-routing/) | Free |
| [Server MX](https://servermx.com/) | Starts at €1 per user/month |
| [Postmark](https://postmarkapp.com/) | Starts at $10 per month |
| [Mailgun](https://www.mailgun.com/) | Starts at $35 per month |
| [Sendgrid](https://sendgrid.com/) | Starts at $15 per month |
Using external email services with FlyWP allows you to leverage specialized providers that offer advanced features, security, and reliability. This approach ensures that your website remains fast and efficient while your emails are managed professionally. Choose a provider that best fits your business needs and enjoy seamless, secure, and reliable email communication.
## Why is my Let’s Encrypt SSL certificate not activating?
You have to ensure your DNS record is pointing to FlyWP provisioned server and DNS is updated worldwide before Let’s Encrypt can issue SSL certificate for you. If you’re using **Cloudflare to manage DNS — make sure you’ve selected SSL mode to Strict, and then try re-generating the Let’s Encrypt SSL on the FlyWP end**.
#### How to Check DNS Records?
[DNSChecker.org](http://dnschecker.org/) is a simple and powerful tool to check DNS records across multiple servers worldwide. Here’s a step-by-step guide on how to use it:
#### 1. **Open [DNSChecker.org](http://dnschecker.org/)**
- Visit [DNSChecker.org](https://dnschecker.org/) in your web browser.
#### 2. **Enter the Domain Name**
- In the input field at the top of the page, type the domain name you want to check. For example, enter `example.`com
#### 3. **Select the DNS Record Type**
- On the right side of the domain input field, you’ll find a dropdown menu labeled “Select Record Type.”
- Click on the dropdown and choose the type of DNS record you want to check (e.g., `A`, `MX`, `CNAME`, `TXT`, etc.).
#### 4. **Click the “Search” Button**
- After entering your domain and selecting the record type, click the “Search” button to initiate the DNS check.
#### 5. **View the Results**
- The page will display a list of DNS servers from various locations worldwide, showing the DNS record values retrieved from each server.
- You can see if the DNS record has propagated correctly across all servers or identify any discrepancies.
#### 6. **Use Additional Features (Optional)**
- **Ping Test**: Check the network latency to your domain from different servers.
- **Traceroute**: View the path that your data takes to reach the domain.
- **DNS Propagation Checker**: Specifically see how DNS changes are spreading across the internet.
#### Tips:
- **Propagation Time**: DNS changes may take some time to propagate globally. Use [DNSChecker.org](http://dnschecker.org/) to monitor the progress.
- **Record Consistency**: Ensure that the records are consistent across all servers to avoid any potential issues.
This simple process allows you to effectively verify DNS records, ensuring your domain is set up correctly.
## How do I run a custom PHP file via cron on a server with multiple subdomains?
You can follow these steps to set up and execute your custom PHP file via Cron:
1. **Add Execution Permission:**
To ensure your PHP file is executable, you need to adjust the file’s permissions. Run the following command to make the PHP file executable within your Docker container:
`docker compose -f /home/fly/domain.com/docker-compose.yml exec php bash -c "chmod +x public/example.php"`
2. **Verify Permissions:**
After setting the correct permissions, you should check to confirm that the changes have been applied. Use this command to list the file and its permissions:
`docker compose -f /home/fly/domain.com/docker-compose.yml exec php ls -lah public`
3. **Execute the PHP File (and Add to Cron):**
Once the permissions are set, you can execute the PHP file manually. This command can also be added to your Cron Jobs for scheduled execution:
`docker compose -f /home/fly/domain.com/docker-compose.yml exec php php public/example.php`
:::note
Be sure to replace *domain.com* with your actual domain and *example.php* with the name of your PHP file before running these commands.
:::
If you encounter any difficulties or need further assistance, please create a support ticket. Our team will be happy to handle the setup for you.
## How do I set up a wildcard SSL certificate with Cloudflare?
Follow this step-by-step guide to configure a wildcard SSL certificate using Cloudflare on FlyWP.
### **Prerequisites**
- Access to your FlyWP dashboard.
- A **Cloudflare API token** with permission to edit DNS records. You can create one by visiting[Cloudflare API Tokens](https://dash.cloudflare.com/profile/api-tokens).
---
### **Steps to Configure Wildcard SSL**
#### **1. Create a Cloudflare API Token**
- Go to the[API Tokens page](https://dash.cloudflare.com/profile/api-tokens) on Cloudflare.
- Create an API token with the necessary DNS permissions for your domain.
#### **2. Access the SSL Settings on FlyWP**
- Log in to your FlyWP dashboard and open the site for which you want to install the wildcard SSL certificate.
- Navigate to the **SSL** tab.
#### **3. Configure SSL with Let’s Encrypt**
- Select the **Let’s Encrypt** option under the SSL settings.
- Confirm your domain names to ensure they match what you want to secure with the wildcard certificate.

---
#### **4. Set Cloudflare as DNS Provider**
- Choose **Cloudflare** as the DNS provider.
- Paste your Cloudflare **API Token** in the provided input box.

#### **5. Install and Activate the Certificate**
- Click the **Install Certificate** button to start the generation process.
- Once the wildcard SSL certificate is generated, click the **Activate** button to enable it.
---
### **Additional Notes**
- Ensure your domain is proxied through Cloudflare so the SSL works seamlessly.
- If you face any issues, double-check your Cloudflare API token permissions and domain configurations.
With these steps, your wildcard SSL certificate should be successfully installed and activated on your FlyWP site.
## How does FlyWP handle security updates?
Security updates are automatically installed, protecting the server against known vulnerabilities. However, other updates, like feature improvements or non-security-related updates, are **not automatically applied** and would require manual installation.
Ubuntu provides a tool named “unattended-upgrades.” FlyWP configures the system so that security updates are applied periodically.
## What is the FlyWP Bot?
FlyWP Bot is a WordPress automation and monitoring bot designed to optimize and manage WordPress hosting environments efficiently. It provides uptime monitoring, performance analysis, and automated maintenance tasks to ensure smooth WordPress operations.
### **Bot Details**
- **Bot Name**: FlyWP Bot
- **Owner**: FlyWP
- **Website**:[https://flywp.com](https://flywp.com/)
- **Purpose**: Uptime monitoring, performance analytics, automation
- **Bot Categories**: Monitoring & Analytics
### **User-Agent Information**
FlyWP Bot identifies itself using the following User-Agent headers:
- FlyWP-UptimeMonitor/1.0 (+{'https://uptime.flywp.com'})
- FlyWP/1.0 (+{'https://flywp.com'})
#### **User-Agent Match Patterns**
To identify FlyWP Bot, look for the following substrings in the User-Agent:
FlyWP | FlyWP-UptimeMonitor
### **IP Addresses**
FlyWP Bot operates from the following static IP addresses:
- 49.13.31.45
- 91.107.195.115
These IPs are dedicated to uptime monitoring and performance analysis. If you wish to allow FlyWP Bot access, you can whitelist these IPs.
### **Verification & Compliance**
FlyWP Bot follows industry best practices and adheres to Cloudflare’s bot verification guidelines. Our bot is designed to:
- Operate with **respectful crawl rates** to avoid server overload
- Use **static IPs** to ensure transparency
- Identify itself clearly via the **User-Agent header**
### **Contact & Support**
For questions or concerns regarding FlyWP Bot, please contact:
- **Support Email**: support@flywp.com
- **Website**:[https://flywp.com](https://flywp.com/)
For website owners who wish to **opt out** of FlyWP Bot’s monitoring services, please reach out to our support team, and we will promptly exclude your domain.
## How do I fix 502 errors caused by FastCGI buffer sizes?
If your WordPress site handles complex requests, like massive WooCommerce queries, heavy API calls, Goolge Ads, or URLs with long query strings, you might have run into a frustrating **502 Bad Gateway** error.
We just rolled out a new update to FlyWP that lets you fix this with a single click by automatically optimising your NGINX and FastCGI buffer sizes. Here is everything you need to know.
:::caution
This is only for NGINX/PHP stack sites, not for OpenLiteSpeed stack.
:::
#### Frequently Asked Questions
##### Why am I seeing 502 Bad Gateway errors?
When a user makes a request with large query parameters, or when a plugin generates a massive response header, NGINX needs somewhere to temporarily store that data. If the data exceeds NGINX’s default buffer size, the connection breaks, resulting in a 502 error.
##### What exactly does this update change?
To safely handle larger data loads, FlyWP adjusts the buffer configurations at both the server level and the individual site level.
- **Global NGINX Configuration (Server-Wide):** FlyWP applies a one-time global update to your server’s custom NGINX configuration file at `/home/fly/.fly/nginx/conf.d/custom.conf` :
```
proxy_buffer_size 128k; proxy_buffers 4 256k; proxy_busy_buffers_size 256k;
```
- **2. Site-Specific NGINX Configuration (Per Site)** For individual sites that require it, FlyWP updates the local limits configuration file at {Site\_directory}/config/nginx/common/limits.conf:
```
fastcgi_buffer_size 64k; fastcgi_buffers 16 32k;
```
##### Why wasn’t this automatically enabled for all my sites?
We initially wanted to migrate every user to these new buffer settings automatically. However, altering core NGINX and FastCGI limits always carries a small risk of accidental site instability or unexpected crashes depending on unique server environments. To keep your live sites 100% safe, we decided to make it an **opt-in feature** for users who actually need it.
##### How do I enable this on my site?
You don’t need to touch a single line of code. You can toggle this optimisation directly from your FlyWP dashboard:
1. Log into **FlyWP** and select your site.
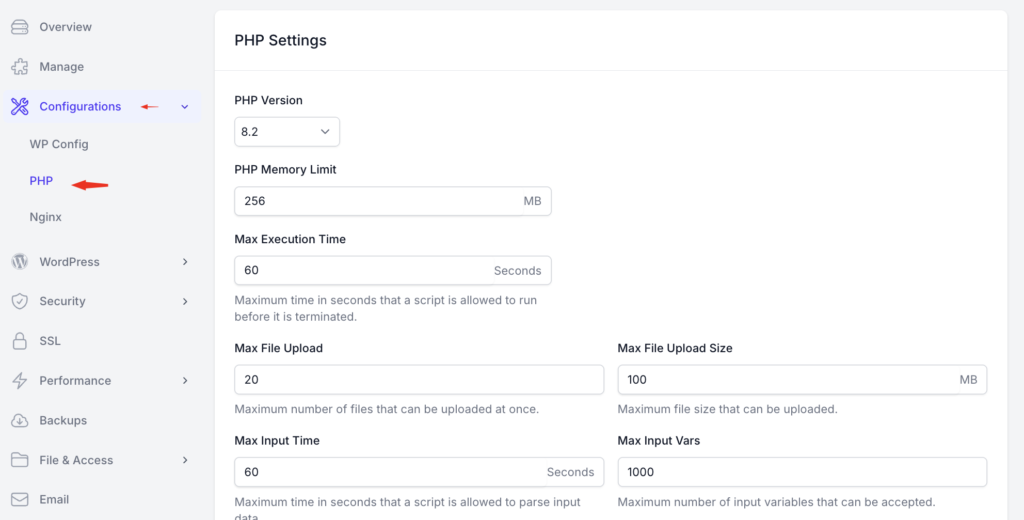
2. Navigate to **Site Dashboard** > **Configurations** > **PHP**.
3. Update any of your PHP settings to apply the optimised buffer limits.
##### Can I further customise these buffer sizes?
Yes. If your site has extreme requirements and the automated values still aren’t enough, you can manually modify the two configuration files mentioned above to fit your needs.
:::caution
If you choose to manually edit these files, the changes will not take effect automatically. You must restart **both** the site NGINX service and the server NGINX service (as they run as separate services) for your custom adjustments to be applied.
:::
## How do I access my server with FileZilla using SSH keys?
Here’s a quick guide to accessing your FlyWP server through FileZilla using SSH keys.
##### **Steps:**
##### **1. Create an SSH Key (If You Don’t Have One)**
- **For Windows:** Use PuTTYgen to generate a key. For more details about how to generate a key you can follow this [link](https://flywp.com/docs/server/ssh-keys/).
- **For macOS/Linux: Open Terminal and run:**
`ssh-keygen -t rsa -b 4096`

##### **2. Set the SSH Key in FileZilla**
- Open FileZilla and go to **Edit > Settings**.
- Navigate to **SFTP** under **Connection** settings.
- Click **Add key file** and select your private key file (e.g., id\_rsa).

##### **3. Use FlyWP Server Credentials**
- Go to your FlyWP dashboard, then **Server > Manage** to find your credentials (IP, username, etc.).

- Enter these details in FileZilla:
• **Host**: Your server’s IP address.
• **Username**: Provided in the server credentials.
• **Port**: Use port 22 for SSH.
##### **4. Done**
Click **Quickconnect** in FileZilla, and you’re connected to your FlyWP server! 🎉