Astro is a popular choice for building fast, content-focused websites. But after developing your website, you still need a reliable way to deploy it, connect your domain, and manage updates without spending hours configuring your server.
That's where Git-based deployment comes in.
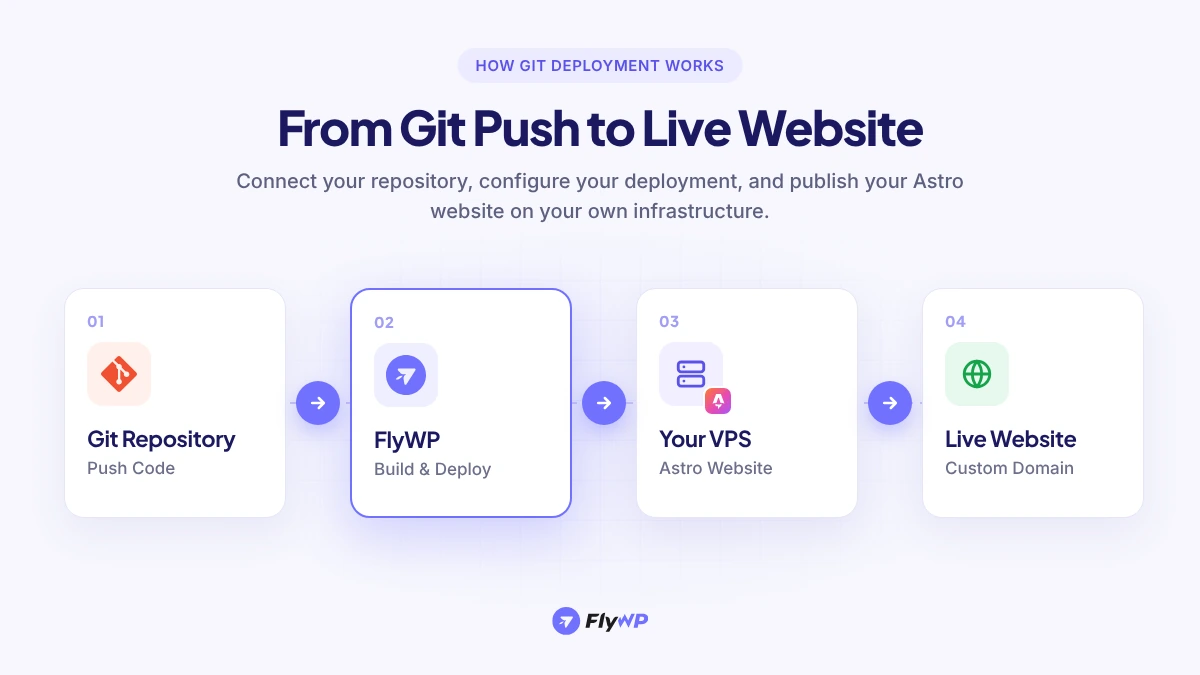
Instead of manually uploading website files or repeating deployment steps every time you make a change, you can connect your Git repository to a deployment workflow and publish updates from your codebase.
FlyWP makes it easier to deploy an Astro site through Git on your own VPS. You can connect your repository, configure your build settings, select the appropriate runtime, and manage your website through the FlyWP dashboard.
In this guide, you'll learn how to prepare your Astro project, deploy it using FlyWP, connect your domain, and troubleshoot common deployment issues.
What Is Astro?
Astro is a web framework designed for building fast, content-driven websites. It is particularly useful for blogs, marketing websites, documentation, and other projects where performance and content delivery matter.
Astro generates static HTML by default, allowing many websites to serve pages without running a server-side application for every request. It also supports server-side rendering when a project requires dynamic, request-time functionality.
Some reasons developers choose Astro include:
- Performance-focused architecture: Deliver lightweight pages with less unnecessary JavaScript.
- Flexible development: Use supported UI frameworks such as React, Vue, and Svelte where appropriate.
- Content-first development: Build blogs, documentation websites, and content-heavy projects.
- Static site generation: Generate pages during the build process and serve the resulting files.
- Server-side rendering: Support dynamic functionality when the project requires it.
Whether you're building a company website, a technical blog, or a landing page, Astro provides a flexible foundation for modern web development. If you're moving an existing site over, our WordPress to Astro guide covers the migration side.
Why Deploy Your Astro Site on Your Own VPS?
Managed hosting platforms can simplify deployment, but developers and agencies may prefer hosting their projects on infrastructure they control.
Self-hosting an Astro website on a virtual private server (VPS) gives you greater control over your hosting environment.
Here are some key benefits.
1. More Control Over Your Infrastructure
Choose a VPS provider that suits your requirements and manage your website within your own server environment.
Your hosting configuration, available resources, and deployment architecture can evolve alongside your project. Our bring your own server guide explains how this model works in practice.
2. Flexible Hosting Costs
A VPS can host multiple applications when its available resources and configuration allow it.
For agencies and developers managing several websites, consolidating suitable projects on one server may help control infrastructure costs. Actual savings depend on server capacity, traffic, and maintenance requirements.
3. A Git-Based Development Workflow
Git provides a consistent way to manage code changes and collaborate with other developers.
By connecting your repository to a deployment workflow, you can update your website through code changes instead of manually transferring files after every revision.
4. A Practical Way to Manage Multiple Websites
If you manage both WordPress and modern JavaScript websites, maintaining separate infrastructure workflows can become complicated.
FlyWP supports WordPress and Git-based Node.js website deployments, helping developers manage different types of projects through one platform. If you run many WordPress sites, see how to manage multiple WordPress sites from one dashboard.
What Do You Need Before Deploying an Astro Site?
Before starting, make sure you have the following:
| Requirement | Purpose |
|---|---|
| Astro project | Your existing website codebase |
| Git repository | Stores your project and deployment branch |
| FlyWP account | Provides access to the deployment dashboard |
| FlyWP-managed server | Hosts your website |
| Domain name | Gives visitors a public address for your website |
| Supported Node.js version | Required for dependency installation and building your project |
Your Astro project should include a package.json file at the repository root, along with its required source files, configuration, dependencies, and package-manager lockfile.
Important: The current FlyWP JavaScript site wizard does not support monorepos. Prepare a repository layout that matches the supported project structure before proceeding.
You'll also need to decide whether your website should use Static or Server runtime. This decision determines how you configure Astro and deploy your project.
Step 1: Choose Between Static and Server Deployment
Before connecting your repository, identify how your Astro website needs to run.
Astro supports different deployment approaches, and selecting the correct one is essential for a successful deployment.
Option A: Static Deployment
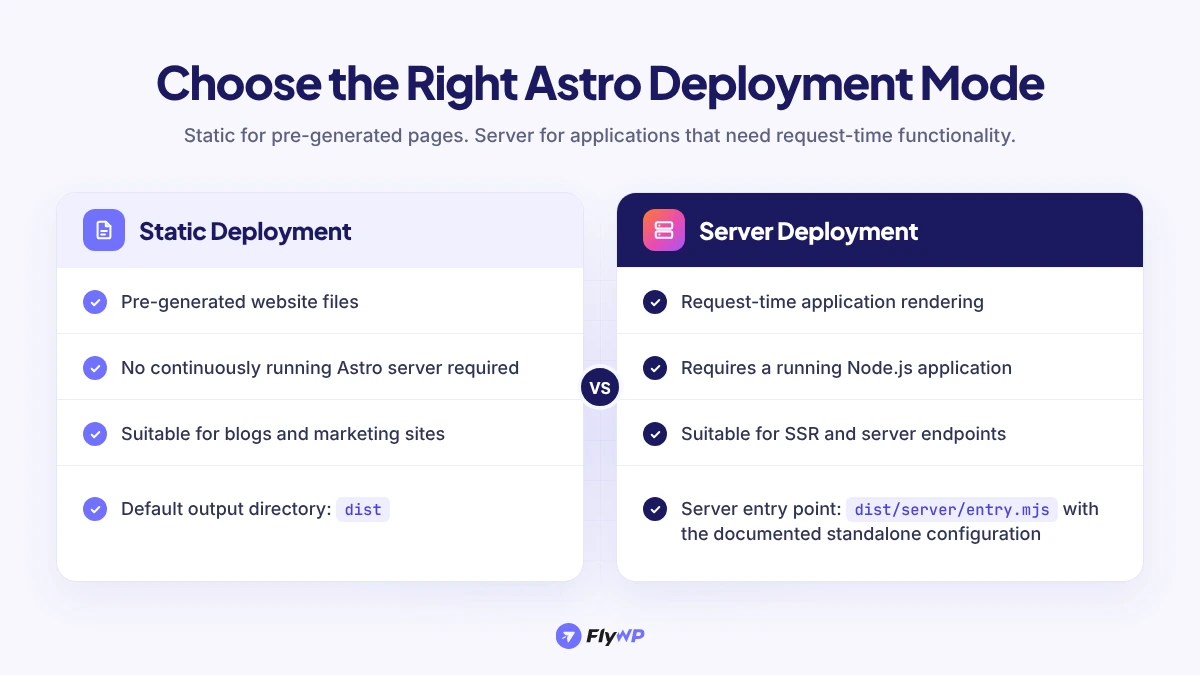
Choose Static runtime if your website can be generated during the build process.
This approach is suitable for:
- Blogs and content websites.
- Marketing websites.
- Documentation websites.
- Portfolio websites.
- Landing pages.
- Websites that use client-side interactive components without requiring an Astro server at request time.
Astro generates your website's HTML, CSS, JavaScript, and other required assets. The generated files can then be served as a static website.
For a standard Astro project, the default build output directory is dist.
Option B: Server Deployment
Choose Server runtime if your project needs functionality that runs when a visitor requests a page.
This may include:
- Request-time page rendering.
- Server-side endpoints.
- Server-side session behavior.
- Other features that require a running application server.
For this setup, Astro needs a compatible server adapter. The Node.js adapter supports deploying Astro as a Node.js server application.
Which should you choose?
If your website only needs pre-generated pages and assets, Static is generally the simpler option. If your application needs Astro's server-side capabilities, use Server runtime and configure the Node.js adapter.
Interactive browser-side components do not automatically require Server runtime. Choose based on your application's actual server-side requirements.
Step 2: Prepare Your Astro Project
Before deploying your website, prepare your project locally and verify that it builds successfully.
Configure a Static Astro Project
Open your astro.config.mjs file and ensure your configuration uses static output.
For example:
import { defineConfig } from 'astro/config';
export default defineConfig({  site: 'https://example.com',  output: 'static',});
Replace https://example.com with your website's actual public URL when available.
If your existing configuration includes integrations or other settings, retain them and merge in the required options rather than replacing the entire file.
Next, make sure your package.json contains a build script:
{ "scripts": { "build": "astro build" }, "engines": { "node": "22.x" }}The Node.js version shown is an example. Choose a version supported by your installed Astro version and integrations, and configure the same intended version in your deployment environment.
Install dependencies and build the project:
npm cinpm run buildAfter the build completes, Astro should generate the production output in the dist directory, unless you've configured a different output directory.
Preview the generated website using a local static server. Check the homepage, nested URLs, images, CSS, JavaScript, and any browser-side API requests.
This helps you identify build or routing problems before deploying.
Configure a Server-Side Astro Project
If your project requires server-side rendering, install Astro's Node.js adapter:
npx astro add nodeReview the configuration generated by the installation process. For a standalone Node.js server, your astro.config.mjs should use the server output mode and Node adapter.
For example:
import { defineConfig } from 'astro/config';import node from '@astrojs/node';
export default defineConfig({  output: 'server',  adapter: node({    mode: 'standalone',  }),});
Merge these settings with your existing configuration and retain any required integrations.
Build the project:
npm cinpm run buildWith the default output directory and standalone Node adapter configuration, Astro generates the server entry point at:
dist/server/entry.mjsYou can test the standalone server locally using:
HOST=0.0.0.0 PORT=4321 node dist/server/entry.mjsPort 4321 is an example for local testing, not a guaranteed production port. When deploying through FlyWP, ensure the application listens on the address and port expected by the configured reverse-proxy setup.
Once your project builds successfully, commit the configuration changes and lockfile to Git.
Step 3: Connect Your VPS to FlyWP
Now that your Astro project is ready, prepare the server that will host it.
- Sign in to your FlyWP account.
- Connect an existing supported server or provision a new one.
- Complete the server setup.
- Confirm that the server is available in your FlyWP dashboard.
FlyWP supports multiple infrastructure providers, giving you flexibility when choosing where to host your website.
If you already have a suitable FlyWP-managed server, you can use it rather than provisioning another one.
Tip: Check your server's available CPU, memory, and storage before deploying. The resources you need will depend on your build process, website traffic, and whether you're running a static site or a server-side application.
Step 4: Create a New Astro Site in FlyWP
With your server ready, you can create your website through FlyWP's site creation workflow. The numbers in each screenshot match the numbers in the steps.
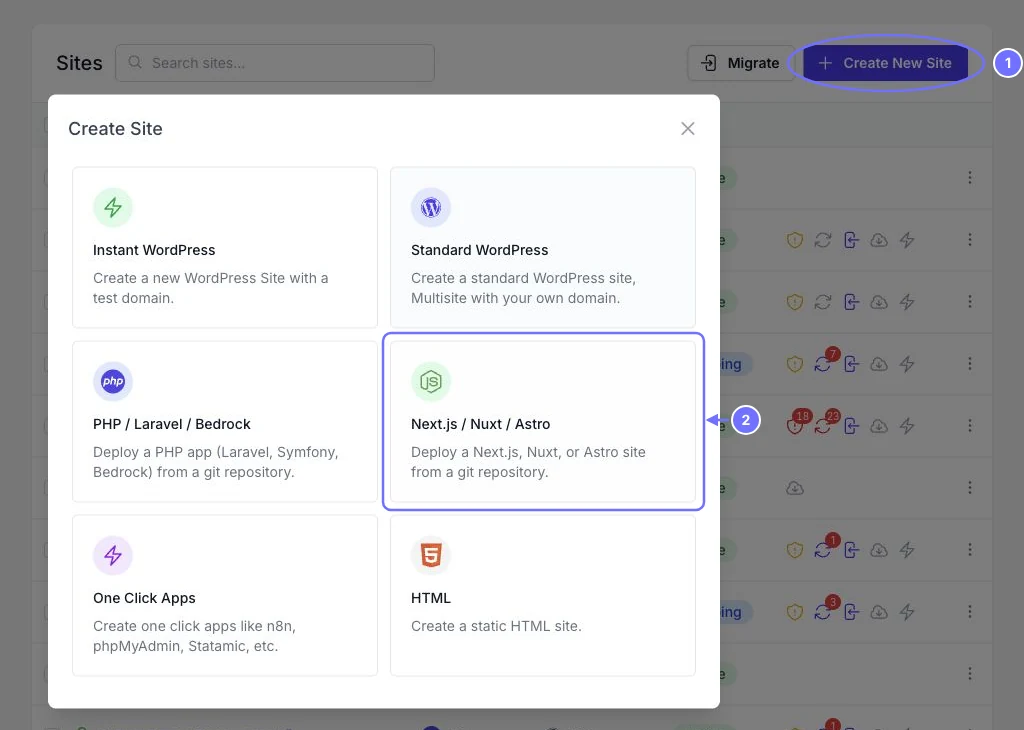
- Open Create Site. On your server's Sites page, click Create New Site (1), then choose Next.js / Nuxt / Astro (2).
- Set the domain. Turn on Use flywp.xyz test domain (1) to try the site first. Or enter your own domain, then tick Add DNS record on Cloudflare and Enable HTTPS (2) for a free Let's Encrypt certificate.
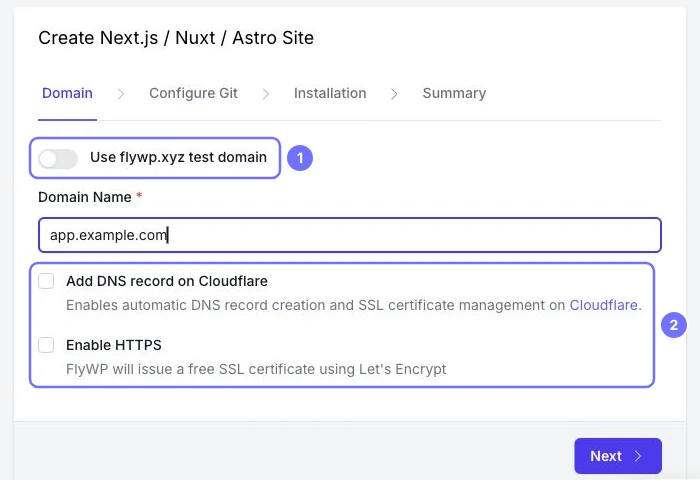
For a test deployment, a FlyWP-provided test domain can help you verify the setup before switching to your final domain.
For a production website, enter the intended custom domain and configure the available DNS and HTTPS options as required.
Continue to the Git configuration step.
Step 5: Connect Your Git Repository
This is where your Astro project becomes part of the deployment workflow.
In the Git configuration screen:
- Select Astro as the application type.
- Choose the appropriate runtime: Static or Server.
- Select your package manager.
- Enter the required build and runtime commands.
- Select your connected Git provider.
- Choose the repository containing your Astro project.
- Select the branch you want to deploy.
For a static site, select Astro as the Application Type (1) and Static as the Runtime (2). Keep the build command npm run build, and set the web directory to /dist (3).
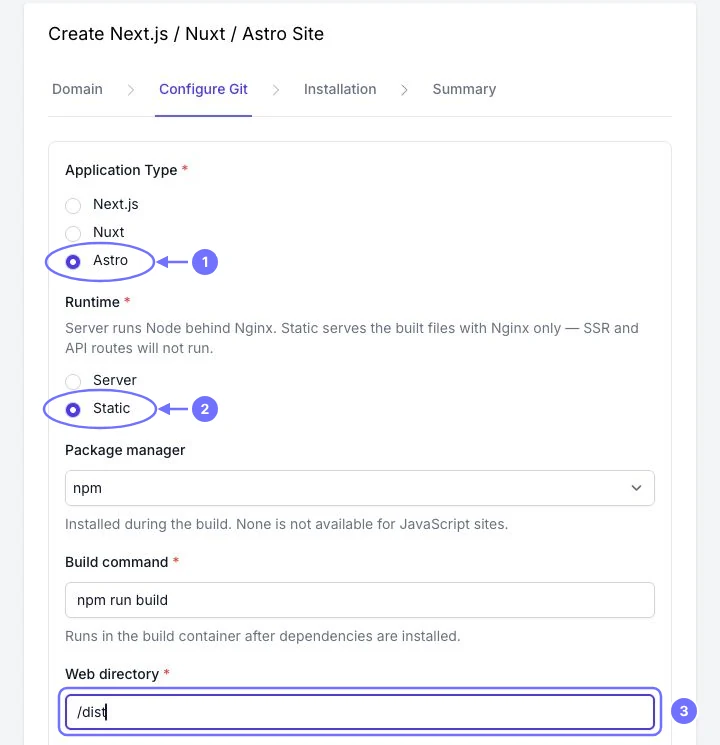
Your exact configuration depends on your project's package manager and deployment mode.
For a standard Astro project using npm, the main settings are:
| Configuration | Static Runtime | Server Runtime |
|---|---|---|
| Application type | Astro | Astro |
| Runtime | Static | Server |
| Package manager | npm | npm |
| Build command | npm run build | npm run build |
| Start command | Not required | node dist/server/entry.mjs |
| Web directory | /dist | /dist, subject to server asset handling |
These are the documented wizard settings for a standard Astro project. If you use a custom output directory or a different package manager, adjust the configuration accordingly.
For example, a pnpm-based project may use:
pnpm run buildMake sure the package manager you select matches your project's lockfile and dependency workflow.
Enable Git-Based Deployment
Pick GitHub, GitLab or Bitbucket (1), then choose your repository and branch. If you want updates to your website to be triggered by pushes to your selected branch, tick Push to deploy (2) when available.
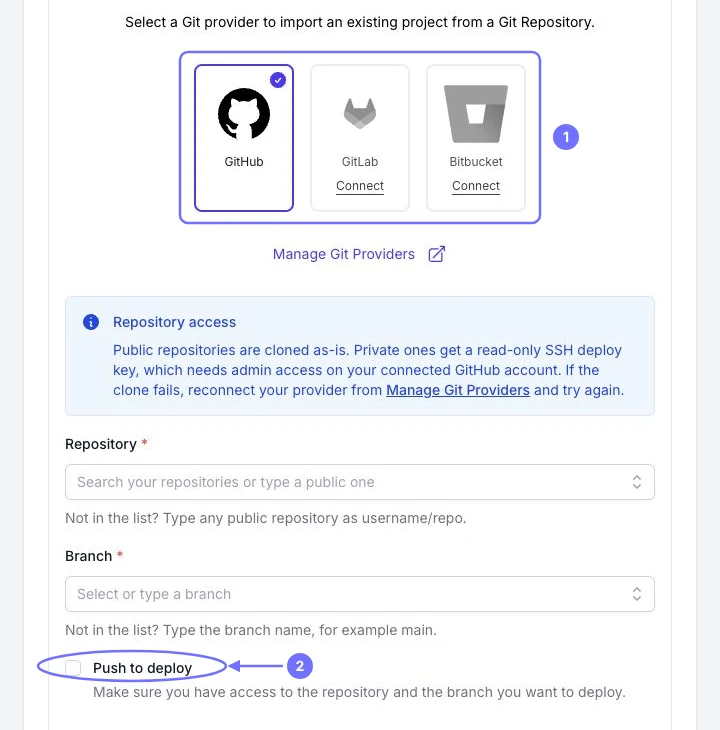
This lets you integrate website updates into your normal development workflow.
Instead of manually uploading every revision, you can push code changes to the configured branch and let the deployment workflow handle the release.
Before proceeding, review your repository access and branch settings to ensure FlyWP can retrieve the correct project code.
Step 6: Configure Your Deployment Settings
Before creating the site, review the build configuration carefully.
Build Command
For a standard Astro project using npm, the build command is:
npm run buildThis runs the build script defined in your package.json.
For Static runtime, the build generates the files that FlyWP serves as your website.
For Server runtime, the build also generates the server application required to handle requests.
Start Command
Static websites do not require a continuously running Astro Node.js server.
For a Server runtime project using Astro's standalone Node adapter, select Server (1), then add the start command (2):
node dist/server/entry.mjs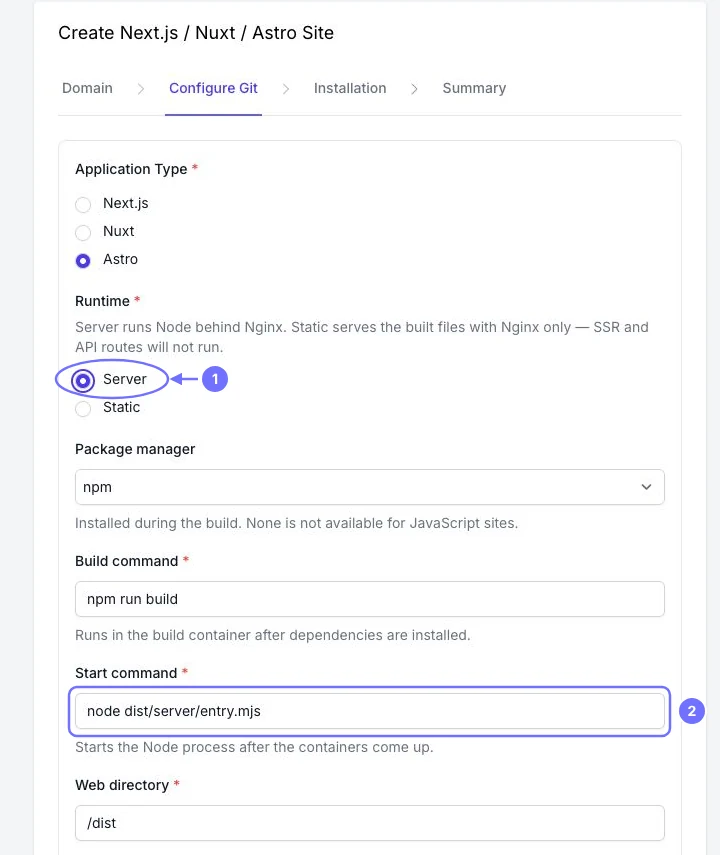
This command assumes the project uses the default output directory and standalone adapter configuration.
If your project uses a different output directory or server configuration, update the command accordingly.
Web Directory
The documented Astro wizard uses /dist as the web directory for the standard configuration.
For Static runtime, confirm that this directory contains your generated website files, including the expected homepage and assets.
For Server runtime, remember that dist contains both server output and client assets. Do not assume that every file in this directory should be exposed as a public static file. Verify that the server application starts correctly and that the browser assets are served through the intended configuration.
Environment Variables
Some Astro projects need environment variables for API access, content sources, or other application settings.
For example:
PUBLIC_API_BASE_URL=https://api.example.comCMS_TOKEN=your-private-tokenThese names are examples. Use the variables your application actually requires.
Astro exposes variables through import.meta.env. Variables prefixed with PUBLIC_ may be included in browser-side code, so never place private credentials in them.
For Static runtime, values used during page generation must be available at build time. Changing an environment value later generally requires a new build if the generated output depends on it.
For Server runtime, configure private runtime variables using an approach supported by your Astro version and Node adapter.
Do not commit real credentials to your repository. The current FlyWP site creation wizard may not expose an environment editor, so verify how your build-time and runtime variables are supplied before relying on them.
Review and Create the Site
Once you've configured your application:
- Continue to the next screen.
- Add a site title on the Installation step. The title also names your test domain.
- Review the deployment summary.
- Check the runtime, build command, start command, web directory, Git branch, and domain.
- Confirm that the settings match your Astro project.
- Click Create Site.
Double-check the configuration before creating the site. A mismatch between your Astro output mode and FlyWP runtime can prevent the website from working correctly.
Step 7: Verify Your Astro Website
After creating your site, check the deployment logs and open the public hostname in a browser.
Don't stop at confirming that the homepage loads. Test the complete website.
Use this checklist:
- The deployment completes successfully.
- The homepage loads correctly.
- Nested pages open directly.
- Images and other assets load.
- CSS and JavaScript work as expected.
- Navigation links point to the correct URLs.
- Browser-side API requests work.
- Server-side routes work, if applicable.
- The website uses the correct domain.
- HTTPS works when SSL is configured.
For Static runtime, verify that the expected pages exist in the generated output directory and that the website doesn't depend on Astro server endpoints.
For Server runtime, test a route that requires request-time rendering and confirm that client-side assets load correctly.
If something fails, check the deployment and startup logs before changing the configuration.
Step 8: Connect Your Custom Domain and Enable HTTPS
If you initially deployed your website using a test domain, you can configure your production domain when you're ready.
The general process is:
- Open your site's domain configuration in FlyWP.
- Add or configure your custom domain.
- Update the required DNS records with your DNS provider.
- Verify that the domain points to the intended server.
- Configure SSL using the available FlyWP options.
- Open the website using HTTPS and test the main pages.
DNS changes may take time to propagate, depending on your DNS provider and record settings.
If you're using a CDN or proxy service, ensure that its DNS and SSL configuration is compatible with your origin server.
Once everything works, share the production URL with your team or clients.
Step 9: Update Your Astro Site Through Git
One of the main benefits of Git-based deployment is the ability to manage updates through your existing development workflow. The same approach works for WordPress projects too, as shown in our WordPress deployment with Git and FlyWP tutorial.
After the initial deployment, you can update your website by following these steps:
1. Make your changes
Edit your Astro pages, components, styles, content, or configuration locally.
2. Test your project
Run the build command and verify that the project builds successfully.
npm run build3. Commit and push your changes
Push your changes to the branch connected to FlyWP.
4. Deploy the update
If Push to deploy is enabled and configured correctly, the push can trigger a new release. Otherwise, use the deployment workflow available for your site.
5. Verify the release
Check the deployment logs and open the website to confirm that your changes are live.
Remember that changes to generated content or build-time environment variables require a new build.
If a source change causes a problem, you can revert the relevant commit and redeploy. Persistent application data, if any, should be backed up and recovered separately.
With this workflow, your Git repository remains the source of truth for your website code.
Common Astro Deployment Issues and How to Fix Them
Even with a simplified deployment workflow, you may encounter problems during the build or release process.
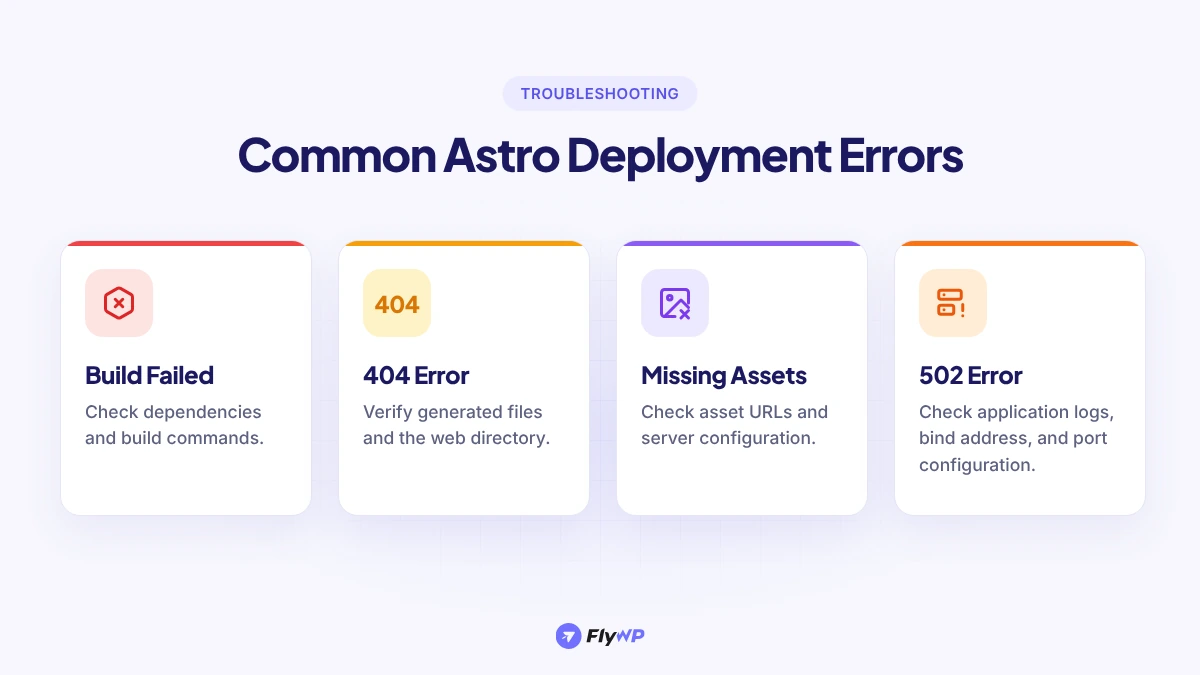
Here are some common issues and their potential solutions.
| Issue | What to Check |
|---|---|
astro command not found | Confirm that dependencies are installed and Astro is listed in your project dependencies. |
| Build fails | Check the build logs, package manager, dependencies, and Astro configuration. |
| Missing server entry point | Verify output: 'server', the Node adapter, standalone mode, and build success. |
| Static homepage returns 403 or 404 | Check whether dist/index.html exists and whether the web directory is correct. |
| CSS or JavaScript files are missing | Check asset URLs, generated client files, and server asset handling. |
| Server-only route fails | Use Server runtime or redesign the functionality for static generation or an external backend. |
| Old content appears | Confirm that a new build was triggered and that the correct branch was deployed. |
| Website returns a 502 error | Inspect application logs and verify that the process is running and its bind address and port match the proxy configuration. |
| Git deployment fails | Verify repository access, branch selection, and deployment logs. |
Troubleshooting tip: Change one configuration at a time and test again. This makes it easier to identify the cause of a failed deployment.
Why Use FlyWP to Deploy Astro Websites?
Deploying an Astro website on your own VPS gives you infrastructure flexibility. FlyWP helps simplify the process by bringing the deployment workflow and server management experience into one platform. You can see everything it offers on the Astro deployments page.
Here's how it can help developers and agencies.
Deploy Through Git
Connect your repository and configure the deployment workflow through FlyWP's JavaScript site wizard.
This provides a structured way to release website updates without relying entirely on manual file transfers.
Manage Your Own Infrastructure
Host your Astro website on a VPS that fits your project's requirements, while retaining control over your hosting environment.
Choose the Right Deployment Mode
Use Static runtime for generated websites or Server runtime when your Astro project requires server-side functionality.
Manage Different Types of Websites
FlyWP supports WordPress websites alongside Git-based Node.js deployments, making it useful for developers and agencies working with different technologies.
Simplify Website Management
Manage supported website and server operations from the FlyWP dashboard instead of handling every task through separate tools.
For developers who want the flexibility of self-hosting without managing every part of the deployment process manually, FlyWP offers a practical way to get started.
Frequently Asked Questions
How do I deploy an Astro site through Git?
Prepare your Astro project, push it to a supported Git repository, connect a VPS to FlyWP, and create a new Astro site through the JavaScript site wizard. Select the appropriate runtime, configure the build settings, choose your repository and branch, and complete the deployment.
Can I deploy an Astro website directly from GitHub?
Yes. You can use a supported Git provider to connect your repository to FlyWP. Select the repository and release branch, configure the deployment settings, and enable Push to deploy if you want supported pushes to trigger new releases.
Can I self-host an Astro website on a VPS?
Yes. Astro websites can be self-hosted on VPS infrastructure. Static projects can serve generated files, while server-rendered projects need an appropriate server adapter and runtime configuration.
Does Astro require Node.js to run?
Not every Astro website requires a running Node.js application in production. Static websites can be served as generated files, although Node.js is generally needed in the development and build workflow. Server-rendered Astro applications require a compatible runtime.
Should I use Static or Server runtime for Astro?
Use Static runtime if your website can be generated at build time. Choose Server runtime if you need request-time rendering, server endpoints, or other server-side functionality. Your Astro configuration and deployment runtime must match.
Can I deploy an Astro SSR website with FlyWP?
Yes. FlyWP's documented Astro workflow supports Server runtime. Configure Astro's Node adapter for standalone mode, build the application, and use the generated server entry point as the start command. Confirm that the server's port and asset handling match your deployment configuration.
Can I use my own domain for an Astro site hosted on FlyWP?
Yes. You can configure a custom domain and the required DNS and HTTPS settings through the supported workflow. Verify your DNS records and SSL configuration before directing production traffic to the site.
Can I automatically deploy Astro when I push changes to Git?
FlyWP's Astro deployment workflow includes a Push to deploy option. When enabled and configured for the appropriate branch, pushes can trigger releases. Verify the repository connection and deployment settings before relying on automatic updates.
Can I deploy Astro without using Vercel or Netlify?
Yes. Astro supports self-hosting, so you can deploy your website on your own VPS rather than relying exclusively on hosted deployment platforms. FlyWP helps manage the deployment workflow on supported infrastructure.
Can I manage Astro and WordPress websites through FlyWP?
FlyWP supports WordPress and Git-based Node.js website deployments, including Astro. This allows developers and agencies to manage supported projects built with different technologies through one platform.
Conclusion
Astro gives developers a flexible way to build fast, modern websites. But choosing the right deployment workflow is just as important as choosing the right framework.
With Git-based deployment, you can maintain your code in a repository, build your website through a repeatable process, and release updates without manually transferring files every time.
FlyWP makes it easier to deploy an Astro site through Git on your own VPS. Connect your repository, choose Static or Server runtime, configure your build settings, and manage your deployment through the FlyWP dashboard.
Whether you're deploying a simple content website or a server-rendered Astro application, the key is to match your deployment configuration to your project's requirements.
Ready to deploy your Astro project?
Get started with FlyWP and explore the Astro deployment documentation.